How to Insert Google Adsense ads automated and manually in blogger/blogspot
If you are uploading rich content at blogger and receiving good organic traffic and want to earn money here are some steps to sign up for adsense.
Before Applying for Adsense you must Know
- Your blogger website receiving good organic traffic minimum. Don't use bots or force people for fake clicks "Greed is curse" (200 or more Visitors daily as per my experience).
- Your Website must not contain Copyrighted, illegal material (Software piracy, selling online weapon or drugs, scamming, Violent content, Gambling, illegal movies song content etc).
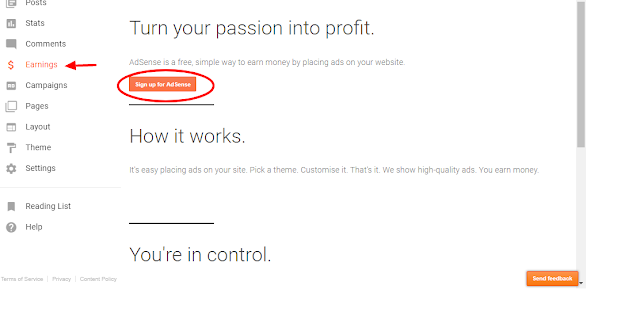
How to Sign Up for Adsense at Blogger
1. Open your blogger Admin Dashboard.
2. Go to Earnings in left Menu and click on Sign Up.
 3. Now Choose your desire gmail account for Sign up.
4. Now you will redirect to Adsense Sign Up Page. Here you will click to accept association for blogger website as shown below.

5. Now wait for adsense email it will take 3 to 4 days or sometimes one week to approve or disapprove your website. Adsense will inform you via Email.


4. Now you will redirect to Adsense Sign Up Page. Here you will click to accept association for blogger website as shown below.

5. Now wait for adsense email it will take 3 to 4 days or sometimes one week to approve or disapprove your website. Adsense will inform you via Email.

How to insert Adsense Ads Automatically
1. Go to Blogger dashboard Left Menu
2. Now Click again on Earning, Here you will See Show Ads on Blog Check Radio button to Yes.
3. In Ad Setup for Blog Choose Display Ads below my post and in the sidebar.

After few minutes ads will start showing at your blogger website. You are done.
How to insert Adsense Ads Manually on Customized theme
1. First login to Adsense and click on My Ads in Right Side Panel.
2. Now Click on New AD Unit
3. Here You will see three types of Adsense Ads
- Text and Display Ads: Used in Header, footer or Left, Right Widget.
- In-feed Ads: Mostly used at Home page in between articles.
- In-Article Ads: Optimized for inside the articles or posts.

Now choose text and display ads, here you will see size based ads

- Responsive: Suitable for all positions and devices Recomended
- Leaderboard (728*90) : Mostly placed in Head or Footer.
- Large Skyscraper (300*600) : Used in Left or Right Widget Menu.
- Large Rectangle (336*280) : Used in Left or Right Widget Menu.
- Large Mobile Banner (320*100) Best for mobile, tabled devices.
4. Choose Responsive and click on Save and Get Code.
5. Now Copy Code Snippet and Log-in to Blogger and click on Layout.
6. In Layout go to Sidebar widget and Click on Add Gadget.
7. Now Choose HTML/Javascript Widget.
8. Paste you Adsense code in text Area and click on Save.
9. Now do it again for other ads.


INSERTING ADS INSIDE THE ARTICLES
 |
| Paste Adsense ad code snippet in blogger HTML |
- Login to Adsense, Create New Ad unit and choose In-Articles ads.
- Now click on Save and Get Ad.
- Copy Code Snippet and open your blogger post. Click on HTML not paste the snippet at your desired place inside the Article.


Thanks for the article. Looking forward to the next post about this topic.
ReplyDeleteaccounts receivable automation software
Very informative post! There is a lot of information here that can help any business get started with a successful social networking campaign. google ads tips
ReplyDeleteThanks for providing recent updates regarding the concern, I look forward to read more. google ads accounts
ReplyDeleteNot long ago, I talked to a gentleman from overseas who is building a really cool little painting robot system. He is working on his PhD project and trying to perfect this robotic system to basically paint a wall with its robotic arm semi-autonomously. Of course, first the robot has to be set up, but then it basically does all the work by itself until it is completed. robotic depalletizing
ReplyDelete